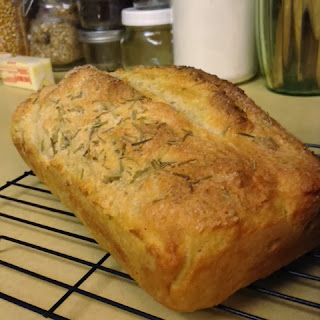
 This recipe has changed the way I do things in the kitchen. This simple recipe has opened up a whole new world of baking for me. Forever, baking anything that needed time to rise or be kneaded on a floured surface was off limits. It just sounded like so much work and mess and clean up. So obviously anything with yeast was a no no, meaning I had actually never baked a loaf of bread. Shame!
I am a cook, I cook. I cook everyday. Baking is different. There is not so much wiggle room, it is not as forgiving of mistakes. I hate the pressure for perfection. I usually have a life motto 'If you're not sure you can do it perfectly, maybe you shouldn't try at all'. Well then, thinking like that will make me miss out on a whole load of stuff. Or should I say "loaf"? No, I shouldn't.
So this simple refrigerator bread dough recipe changed that. I tried it, it was amazing and easy and mess-free. This has lead me to try making scones, which did not have yeast but required kneading on a floured surface. Then pizza dough and traditional rising bread. I did some buttermilk biscuits too. Next stop, pita bread? Challa? The options are now endless!
 |
| On this loaf, I sprinkled some rosemary and sea salt on the top before baking. |
Ingredients:
3 cups warm water1 1/2 tablespoon active dry yeast
1 1/2 tablespoon salt
2 cups semolina
4 1/2 cups flour
Instructions:
- Put warm water in a container with a lid, a Tupperware container works great. It needs to be about 1.5 gallons in size.
- Make sure the water is not too hot. Stick a finger in there, if you can't hold it in then it is too hot.
- Add the yeast and salt and stir a little so everything is wet. Let it stand 2 to 5 minutes until small bubbles start to form on the surface. That is the yeast coming to life.
- From there just dump the rest in and stir, stir, stir with a wooden spoon until there are no dry pockets left.
- Put the lid on loosely and set container somewhere warm and private while the yeast gets busy with the flour and semolina. It will rise, almost filling the whole container. Let it sit for at least 2 hours but no big deal if it's longer.
- After, snap that lid on and stick it in the fridge. You're done. You can forget about that dough for weeks if you want. You'll probably want to bake it into bread though, but wait at least 2 to 4 hours of fridge time before you do.
- When you're ready for a fresh loaf, preheat your oven to 450 and grease a loaf pan. Spray your hand with some nonstick cooking spray or oil it up and grab about 1/3 of the dough from the container and put it in the loaf pan.
- Score the top of the loaf with a knife. This will help it look more uniform and prevent it from splitting on its own while baking.
- Bake at 450 for 30 minutes.
- Remove from oven and pan and let cool on a wire rack.
- Eat that bread! It's good!
Lanni's Notes:
So that's it, now you have 2 more loafs of bread waiting to be baked sitting in your fridge. The longer it sits the better it tastes in my opinion. I've stopped buying bread at the store and just keeping this dough ready to go. I don't even wash the container when I grab my last loaf's worth of dough. I just mix and new batch while the last loaf is in the oven baking and let it do it's thing. No mess to clean up ever!This recipe works just as well only using flour and skipping the semolina. I like the semolina because the texture is a little better, the outside is a little crustier and the flavor is a bit nutty. Try for yourself and see what you like. Try all flour, try half and half. Any ratio will work and it's just a matter of taste.
So now I know I can let something rise and not ruin it. This opened up doors for me. I did, however, forget the salt once. Big mistake. The salt keeps the yeast from going crazy so without salt it was way yeasty and bitter. It tasted and smelled like the beer breath the morning after a night of drinking. Don't forget the salt!
*I do not have a bread maker and I have never used one. I hear they are awesome and super easy. Maybe someday I will have one, but until then, this is the way to go!


No comments:
Post a Comment