Sunday, January 19, 2014

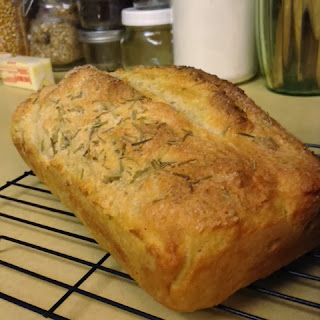
The Easiest Loaf of Bread You'll Ever Bake

This recipe has changed the way I do things in the kitchen. This simple recipe has opened up a whole new world of baking for me. Forever, baking anything that needed time to rise or be kneaded on a floured surface was off limits. It just sounded like so much work and mess and clean up. So obviously anything with yeast was a no no, meaning I had actually never baked a loaf of bread. Shame!

I am a cook, I cook. I cook everyday. Baking is different. There is not so much wiggle room, it is not as forgiving of mistakes. I hate the pressure for perfection. I usually have a life motto 'If you're not sure you can do it perfectly, maybe you shouldn't try at all'. Well then, thinking like that will make me miss out on a whole load of stuff. Or should I say "loaf"? No, I shouldn't.

So this simple refrigerator bread dough recipe changed that. I tried it, it was amazing and easy and mess-free. This has lead me to try making scones, which did not have yeast but required kneading on a floured surface. Then pizza dough and traditional rising bread. I did some buttermilk biscuits too. Next stop, pita bread? Challa? The options are now endless!

On this loaf, I sprinkled some rosemary and sea salt on the top before baking.
For the easiest bread recipe ever - try this!

Ingredients:

3 cups warm water
1 1/2 tablespoon active dry yeast
1 1/2 tablespoon salt
2 cups semolina
4 1/2 cups flour

Instructions:

  • Put warm water in a container with a lid, a Tupperware container works great. It needs to be about 1.5 gallons in size.
  • Make sure the water is not too hot. Stick a finger in there, if you can't hold it in then it is too hot.
  • Add the yeast and salt and stir a little so everything is wet. Let it stand 2 to 5 minutes until small bubbles start to form on the surface. That is the yeast coming to life.
  • From there just dump the rest in and stir, stir, stir with a wooden spoon until there are no dry pockets left.
  • Put the lid on loosely and set container somewhere warm and private while the yeast gets busy with the flour and semolina. It will rise, almost filling the whole container. Let it sit for at least 2 hours but no big deal if it's longer.
  • After, snap that lid on and stick it in the fridge. You're done. You can forget about that dough for weeks if you want. You'll probably want to bake it into bread though, but wait at least 2 to 4 hours of fridge time before you do.
  • When you're ready for a fresh loaf, preheat your oven to 450 and grease a loaf pan. Spray your hand with some nonstick cooking spray or oil it up and grab about 1/3 of the dough from the container and put it in the loaf pan.
  • Score the top of the loaf with a knife. This will help it look more uniform and prevent it from splitting on its own while baking.
  • Bake at 450 for 30 minutes.
  • Remove from oven and pan and let cool on a wire rack.
  • Eat that bread! It's good!

Lanni's Notes:

So that's it, now you have 2 more loafs of bread waiting to be baked sitting in your fridge. The longer it sits the better it tastes in my opinion. I've stopped buying bread at the store and just keeping this dough ready to go. I don't even wash the container when I grab my last loaf's worth of dough. I just mix and new batch while the last loaf is in the oven baking and let it do it's thing. No mess to clean up ever!

This recipe works just as well only using flour and skipping the semolina. I like the semolina because the texture is a little better, the outside is a little crustier and the flavor is a bit nutty. Try for yourself and see what you like. Try all flour, try half and half. Any ratio will work and it's just a matter of taste.

So now I know I can let something rise and not ruin it. This opened up doors for me. I did, however, forget the salt once. Big mistake. The salt keeps the yeast from going crazy so without salt it was way yeasty and bitter. It tasted and smelled like the beer breath the morning after a night of drinking. Don't forget the salt!

*I do not have a bread maker and I have never used one. I hear they are awesome and super easy. Maybe someday I will have one, but until then, this is the way to go!


Tuesday, December 31, 2013

Coconut Macaroons Dressed Three Ways

I love coconut and I love coconut macaroons. I had never tried to make them at home because I just assumed they would be complicated and messy. It crossed my mind one day that my husband loves coconut and I've never bought or made him macaroons. I looked online at a few recipes and realized these were not difficult to make after all! Quick, easy, and not too messy.

There are a lot of recipes out there that call for no flour. Some of these recipes call themselves 'gluten free'. Whatever. When I get a good coconut macaroon from a bakery I enjoy the cake like texture on the bottom of the cookie, so here it is, I like it with gluten thank you very much. If it makes you feel good you can call these "Low Fat Coconut Macaroons". They only call for egg whites, no yolks, and no butter or oil. Also, coconut is like a fruit or something, right?

Ingredients:

About 5 cups sweetened shredded coconut (14 oz package)
4 egg whites
2/3 cups sugar
1/3 cup flour
1/4 teaspoon salt
1/2 teaspoon vanilla extract


Instructions:

  1. Preheat your oven to 325F
  2. In a medium bowl, combine all ingredients
  3. Drop packed spoonfuls of the mix onto a baking sheet lined with parchment paper or a silicone baking mat leaving at least an inch between each cookie
  4. Bake for 25-30 minutes at 325F or until lightly golden
  5. Cool for a few minutes on the sheet before transferring to a wire rack to finish cooling
Mix well

Everybody in!
Separate eggs, using only the whites


Variations:

Like chocolate? Good for you! Add some. You can melt down some chocolate chips in a double broiler. Let it cool to about room temp and then dip the already cooled cookies. They look great if you just dip the bottom and put the on parchment paper and stick them in the fridge to set.

I do like chocolate, but for me, less is more. I like to drizzle the melted chocolate across the tops of the cookies. It looks fancy too.

Like Almond Joy candy bars? Make your macaroons joyful by pressing one whole almond into the top of each cookie before baking then cool and drizzle with chocolate. Those are sure to impress!

Notes:

Don't throw out those egg yolks! Make sure to save them and use them for another recipe. A little planning goes a long way. I planned and made pasta carbonara with this recipe after finding a carbonara reccipe that called for four egg yolks. Nice! Next time I'll make mayonase or custard with the yolks instead.


Saturday, December 21, 2013

New England Clam Chowder

New England Clam Chowder

Ingredients

  • 1 cup chopped onion
  • 3 cloves garlic
  • 4 cups peeled and diced potatoes
  • 1 cup diced celery
  • 1 teaspoon salt
  • 1/2 teaspoon ground black pepper
  • 2 (10 ounce) cans minced clams, drained with juice reserved

Directions

  1. In a blender or food processor, combine onion, garlic and enough water to make a smooth paste. Set aside.
  2. In a large pot, combine potatoes, celery, salt, pepper, onion mixture and juice from clams. Add enough water to cover. Bring to a boil, then reduce heat and simmer until potatoes are soft, 20 minutes.
  3. Stir in half-and-half.
  4. In a small pot melt butter and stir in flour. Keep stirring until it bubbles and starts to thicken. Whisk into soup. Cook and stir until thickened.
  5. Stir in clams.
  6. Salt and pepper to taste

Friday, December 20, 2013

Arancini - Italian Stuffed Rice Balls


Ingredients:

2 cups prepared risotto, cold
½ cup grated Parmesan
3 eggs, (1 for the rice mixture and 2 for breading)
8 small cubes fresh mozzarella or whatever cheese you have on hand (or meat filling, your choice)
1 cup Italian Breadcrumbs
Oil, for frying

Directions:

In a large heavy-bottomed pot heat 4 inches of vegetable oil on medium.
Combine the rice, Parmesan and 1 egg in a bowl and use your hands to thoroughly combine the mixture.*See Lanni's notes for tips
In a separate bowl whisk together the remaining 2 eggs and set out the bread crumbs on a plate.
Form the arancini balls by squeezing some rice in the palm of your cupped hand. Flatten it out making a little bowl. Put the cheese in the center then add a little more rice to make a lid and squeeze it into a ball.
Dip each arancini in the eggs and then roll it in the breadcrumbs.
Once the oil reaches 375ºF, add 2 or 3 of the breaded arancini to the pot and fry them until golden brown. Don't overload the fryer.
Use a slotted spoon to remove the fried arancini from the pot and transfer them to a paper towel-lined plate. Immediately salt the arancini. Repeat the frying process with the remaining arancini.
Serve the arancini warm with a side of warm marinara sauce.
Lanni's Notes: great recipe, but even simpler still is to just use left over plain rice you have in the fridge from yesterday's meal. About 2 cups. I always make extra rice to put in the fridge for this or making fried rice. Stir in a beaten egg, black pepper and Parmesan. Form the balls with whatever filling you have. You can make a meat filling or use chopped prosciutto, cheese and peas. Or just cheese and peas. Have nothing else? Just use cheese! Roll the formed balls in a beaten egg and then into seasoned bread crumbs.
Fry Them: I have honestly never tried to bake the balls as some other recipes suggest. Deep frying is best. If you deep fry them at the correct temp they won't come out greasy. Use a deep fryer or a heavy bottomed pot with at least 3 or 4 inches of oil in it. I use corn oil. You can strain and save your oil for frying another time as long as you never burn it. Make sure you wait to put the balls in the oil until the oil is hot, between 350 and 360 degrees. Fry until golden brown. Remove with a slotted spoon onto paper towel lined plate. I can tell when my oil is hot enough even without a thermometer by carefully flicking a drop of water in and when it spits and sizzles it's ready to go. Be patient, if you put them in too soon and the oil isn't hot enough you will end up with soggy, greasy balls. Nobody likes greasy balls! Ha!
Hint: For rolling the balls, always start with clean cool hands. You will need to rinse your hands with cold water between each ball you form. If not, your hands will be too sticky and the rice will stick to you instead of to itself.

Spiced Pumpkin Cookies (Only 2 Ingredients!)

9/22/13

2 Ingredient Pumpkin Cookies

I am craving all things autumn right now. Squash in all forms. Today I wants something pumpkin, baked and sweet. I also didn't want to put out too much effort. I also want cookies. I am pregnant and indecicive. I looked online and found this recipe for an easy soft pumpkin cookie on cookiesandcups.com. Looks like a cute blog, I will be back there when I need more ideas for sweets.
Here's the link to their recipe. It's the easiest thing I've ever made.
http://cookiesandcups.com/2-ingredient-pumpkin-cookies/
 photo fdde263d-17f5-4e75-86a7-a2d0a1e1dc5d_zpsf364cae1.jpg

Ingredients:

1 15oz can of pumpkin puree
1 box of spice cake mix

Instructions:

preheat to 350
mix stuff together
spoon onto wax paper lined cookie sheet
cook for 13-15 minutes until edges are turning golden

Lanni's Notes: Makes 2 dozen. Frost or ice them if you like. I think mixing in some chopped walnuts would be a nice addition. I bet you could do this same recipe with any flavor cake mix. You could probably sub mashed banana instead of pumpkin... I'll have to try that and get back to you.

My cookies didn't turn out looking as nice as the pictures on the Cookies and Cups blog. I like mine looking messy and homemade. They're for eating anyway, right? I bet if I made them a little smaller and was more careful in how I plopped them onto the sheet, they would look more like cookies and would make for a nice gift.

Best Ever Peanut Butter Chocolate Chip Cookies


Best Ever Peanut Butter Chocolate Chip Cookies

Ingredients

  • 1 stick butter, room temp
  • 1/2 cup creamy peanut butter
  • 1/2 cup dark brown sugar
  • 1/2 cup granulated sugar
     
  • 1 egg
  • 1 tsp vanilla
  • 1 cup flour
     
  • 1/2 tsp baking soda
  • 1/2 tsp salt
  • 1 1/2 cups chocolate chips

Instructions


  1. Preheat oven to 375.
  2. Cream the butter and peanut butter for a minute or so. I don't have a mixer so I do this all by hand.
  3. Add sugars and beat for another minute. Add egg and vanilla and mix until smooth.
  4. Add flour, baking soda and salt and mix until thoroughly combined. Fold in chocolate chips.
  5. Stick dough in the fridge for 15-20 minutes and let chill.
  6. Drop the dough by the small scoopfuls onto a non-stick baking sheet or baking sheet lined with parchment paper or silicone baking mat.
  7. Bake for 10-12 minutes until edges are golden brown. Let cookies cool on baking sheet for 10 minutes and then transfer to a rack to cool completely.